Why Most Balance Advice Fails Beginners (And What to Do Instead)
When I first tried to improve my balance, I did what everyone does: I stood on one leg, grabbed the wall, and promptly fell sideways. I thought I was weak. It turns out, I was just skipping the foundational steps that most online guides never mention. The problem with popular balance exercises is they assume you can already stand on one leg without wobbling. If you're a true beginner, that assumption is scary and discouraging.
Here's the thing nobody tells you: balance is a skill you build in layers, not a switch you flip. You don't need to start with single-leg stands. You can start with two hands on a counter, then one finger, then zero hands. That's the entire ladder. In this guide, I'll walk you through the exact progression I used to go from wobbling while holding the kitchen counter to standing on one leg for 30 seconds without support. You'll also learn how to weave balance into your daily routine, so it becomes automatic rather than a chore you dread.
Let's answer the question you actually asked: What are some easy balance exercises for beginners? The answer isn't a list of moves. It's a system. The system is the Supported-to-Unsupported Balance Ladder.
The Supported-to-Unsupported Balance Ladder: Your Step-by-Step Path
Think of this ladder as a way to build confidence before strength. Every rung reduces the amount of support you use, so you never feel like you're going to fall. Most people don't realize that the fear of falling is the biggest limiter, not weak ankles. By starting with solid support, you teach your brain that it's safe to wobble.
Rung 1: Two-Hand Support (The Safe Start)
Stand facing a sturdy kitchen counter, table, or wall. Place both hands flat on the surface, about shoulder-width apart. Your feet should be hip-width apart. Now, shift your weight onto your right leg and lift your left foot just an inch off the floor. Hold for 5 seconds. Lower. Repeat on the other side. That's it. Do this 5 times per side.
This is the most beginner-friendly balance exercise because your hands are doing most of the stabilizing work. If you wobble, the counter catches you. I once had a client who couldn't even do this without gripping the counter so hard her knuckles turned white. We worked on breathing and relaxing her shoulders. After a week, she could do it with a gentle touch.
What can go wrong: You might arch your back or hold your breath. Keep your spine neutral and breathe normally. If you feel any sharp pain in your hip or knee, stop and check your foot placement. The key is to keep the movement small.
Rung 2: One-Hand Support (Building Independence)
Once you can do Rung 1 without anxiety, reduce to one hand. Place your right hand on the counter and stand on your right leg, lifting the left foot an inch. This forces your non-dominant side to work harder. Switch sides. Aim for 5-10 seconds per leg.
Here's a practical detail: Use your fingertips rather than a full palm grip. This reduces the support slightly and trains your body to rely less on the hand. If you feel unstable, go back to two hands. There's no shame in moving down the ladder. Progress is not linear.
Rung 3: One Finger Support (The Confidence Builder)
This is the rung where most people feel a breakthrough. Stand near a wall or counter. Lightly touch the surface with one finger from your non-dominant hand. Now stand on one leg. The finger is not bearing weight; it's just a reference point. Your brain thinks it has support, so it relaxes. This is the trick that makes balance feel almost magical.
When I first tried this, I could barely hold 5 seconds. Then I realized my finger was pressing too hard. The goal is to make the touch so light that if you put a piece of paper between your finger and the wall, the paper would barely move. That's the sweet spot. Practice this for 10-15 seconds per leg, switching sides. Do this 3 times a day - maybe while you brush your teeth or wait for your coffee to brew.
Rung 4: No-Hands Static Balance (The Real Deal)
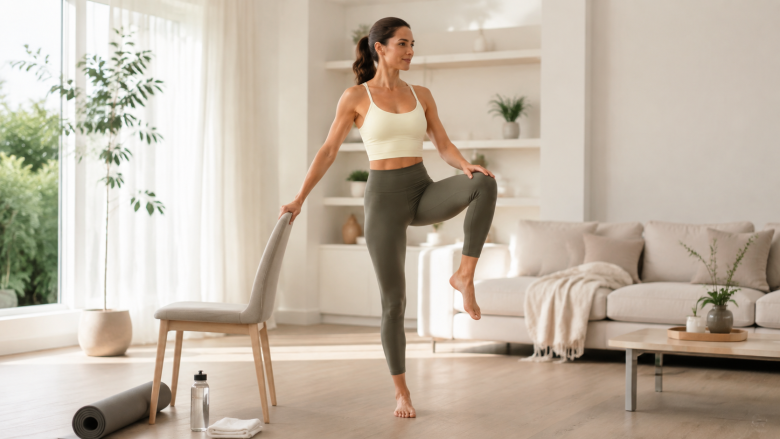
Now you're ready to stand on one leg without any support. But don't just jump into it. Start by standing near a wall or chair, so you can reach out if needed. Lift your foot and hold for 5 seconds. If you wobble, that's normal. Let your arms float out to the sides like a tightrope walker. This is called the "airplane arms" position. It helps with counterbalancing.
A common mistake is to look down at your feet. Instead, fix your gaze on a non-moving object at eye level, like a picture frame or a light switch. This gives your visual system a stable reference point. Most people don't realize that your eyes are a major part of your balance system. If you stare at a moving object (like a ceiling fan), your balance gets worse.
If you can hold this for 15 seconds on each leg, you've graduated from beginner to intermediate. Celebrate that. But the ladder doesn't stop here.
Micro-Sessions: 2-Minute Balance Workouts Tied to Daily Triggers
One of the biggest barriers to consistency is time. You think you need to block out 10 minutes for balance exercises. You don't. I recommend micro-sessions of 2-3 minutes, done 3 times a day, tied to activities you already do. This is how you build balance into your daily habits without it feeling like a workout.
Here are three triggers to use, each with a specific exercise:
- While brushing your teeth: Stand on one leg, holding the sink with one hand. Switch legs halfway through. This is a perfect Rung 2 exercise. You're already at the sink - why not use it? I've been doing this for two years and it's become automatic.
- While waiting for the kettle to boil: Do the one-finger touch (Rung 3). The kettle takes about 2-3 minutes. That's exactly enough time for one set per leg. By the time the water boils, you've done a balance session.
- After washing your hands: Stand on one leg without support (Rung 4) for 10 seconds. If you wobble, grab the towel rack. This is a high-trigger moment because your hands are already wet, so you're less likely to forget.
These micro-sessions add up to about 6-9 minutes of balance work per day, which is more than enough to see progress in 2-3 weeks. The key is to never skip a trigger. Even if you're tired, just do 5 seconds. The habit is more important than the duration.
The Wobble Check: Troubleshooting When Balance Fails
You will wobble. You will fall out of the pose. That's not failure; it's feedback. The question is: what do you do when it happens? Most guides tell you to "try again" without explaining why you wobbled. Here's a simple "wobble check" to diagnose the issue:
- Wobble in the ankle: Your foot is too flat. Try to press the big toe and the heel into the floor, as if you're gripping the ground. This activates the small muscles in your foot that stabilize you.
- Wobble in the knee: Your leg is too straight. Soften the knee slightly (a micro-bend) so it can act as a shock absorber. A locked knee is rigid and unstable.
- Wobble in the hip: Your core is disengaged. Gently draw your belly button toward your spine. Don't suck in; just engage the deep abdominal muscles. This stabilizes the entire chain.
- Wobble in the upper body: You're holding your breath. Take a slow exhale through your mouth. Relax your shoulders away from your ears. Balance is a full-body conversation, not a static pose.
If you still can't stabilize, go back to the previous rung. I once had to spend two weeks on Rung 2 before I could progress. That's fine. The ladder is not a race. It's a confidence-building tool.
What Are 5 Exercises for Balance for Seniors at Home? (And How to Adapt Them for Any Age)
This question comes up often, and the answer is similar to the ladder but with safety modifications. Seniors (or anyone with limited mobility) should start with chair-supported exercises. Here are five that work well, and I'll explain how to make them progressively harder as you improve.
1. Sit-to-Stand with Pause
Place a sturdy chair against a wall. Sit down, then stand up without using your hands. Pause at the top for 3 seconds before sitting back down. This strengthens your legs and challenges your balance at the transition point. If you need hands, use the armrests. Gradually reduce the number of fingers you use until you can do it hands-free.
2. Heel-to-Toe Walk (Supported)
Place one hand on a counter. Walk heel-to-toe (placing the heel of one foot directly in front of the toes of the other foot) for 10 steps. This is a classic dynamic balance exercise, but the support makes it safe. As you improve, reduce to one finger, then no hands.
3. Clock Reach
Stand on one leg (with chair nearby). Imagine you're standing in the center of a clock. Reach your free leg forward to 12 o'clock, then side to 3 o'clock, then back to 6 o'clock. Keep your hands on the chair if needed. This is excellent for hip stability and spatial awareness. Start with just one direction, then add more over weeks.
4. Single-Leg Stance at the Sink
Same as Rung 2 from the ladder. Hold the sink with one hand, stand on one leg for 10 seconds. Switch sides. This is a safe, everyday exercise that doesn't require extra time.
5. Tandem Stance (One Foot in Front of the Other)
Stand with feet together, then step one foot forward so its heel touches the toes of the other foot. Hold a chair or wall for support. This mimics the narrow base of walking and is excellent for fall prevention. Hold for 15 seconds, then switch which foot is forward.
If you're looking for a structured 10-minute routine, combine these five exercises: do each for 2 minutes (with rest as needed). That's a perfect 10-minute balance session for seniors or anyone who wants a gradual approach. For a deeper dive on how to build daily habits that support your health, see our article on 7 Simple Morning Practices for More Vitality - it pairs well with this balance work because morning routines set the tone for the day.
What Are Some Good 10-Minute Balance Exercises for Seniors? (A Complete Routine)
Here's a structured 10-minute routine that uses the ladder concept. You can do it seated or standing, with or without support. I'll give you both options. The key is to move at your own pace and never rush.
Warm-up (1 minute): March in place while holding a chair. Lift your knees gently. This gets blood flowing and wakes up your lower body.
Exercise 1: Two-Hand Single-Leg Stance (2 minutes) Hold a counter with both hands. Stand on your right leg for 30 seconds, then left leg for 30 seconds. Repeat once. If you feel steady, reduce to one hand for the second round.
Exercise 2: Heel Raises (2 minutes) Stand with feet hip-width apart, holding a chair. Slowly rise onto your toes, hold for 2 seconds, then lower. Do 10 reps. This strengthens your ankles, which are crucial for balance. If you wobble, that's normal. The chair prevents falling.
Exercise 3: Clock Reach (2 minutes) As described above. Hold the chair with one hand. Reach your free leg forward, side, and back. Do 5 cycles per leg. If you need more support, hold the chair with both hands and do smaller reaches.
Exercise 4: Tandem Stance (2 minutes) Stand with feet in a straight line (heel to toe), holding a wall. Hold for 30 seconds, then switch which foot is in front. Repeat once. If you feel unsteady, widen your stance slightly.
Cool-down (1 minute): Gentle ankle circles while seated. Circle your foot 10 times clockwise, then 10 times counterclockwise. Switch feet. This reduces stiffness and improves mobility.
This routine is safe for most seniors, but always consult your doctor if you have concerns about falls or medical conditions. The most important thing is to do it consistently. Even 3 times a week can make a noticeable difference in 4 weeks.
Integrating Balance into Your Daily Life: Beyond the Exercises
Balance exercises are only half the story. The other half is how you move throughout the day. Most people don't realize that how you stand in line at the grocery store is a balance opportunity. Instead of leaning on the cart, stand with your feet hip-width apart, engage your core, and gently shift your weight from one foot to the other. That's a dynamic balance exercise.
Here are a few more ways to integrate balance without thinking about it:
- Put on socks while standing: Instead of sitting down, stand on one leg while putting on a sock. Hold the wall at first. This is a functional balance challenge that you do every day.
- Walk on different surfaces: If you have carpet, hardwood, and tile in your home, walk across them barefoot. Each surface gives your feet different sensory input, which trains your balance system.
- Stand while folding laundry: Instead of sitting, stand at the counter and shift your weight between legs. This is a low-key way to practice maintaining stability.
One of my biggest insights came from a client who was terrified of falling. She refused to do any balance exercises. I asked her to simply stand while brushing her teeth. She did that for a week. Then she added a leg lift. Within a month, she was doing the full ladder. The fear of falling is real, but it can be overcome with small, safe steps.
If you're still feeling unsure, I recommend starting with just one micro-session per day. Maybe the teeth-brushing stance. Do it for a week. Then add a second micro-session. This gradual approach respects your fear while building your confidence. And remember, the ladder goes both ways: if you have a bad day and feel unstable, go back to two-hand support. There's no shame in that. The goal is not perfection; it's consistency.